Introduction: Elevating Robotic Capabilities with Advanced Sensing
In modern industrial automation, the difference between a simple pick-and-place robot and a highly adaptive, intelligent system often comes down to its ability to perceive and react to its environment. Advanced sensors are the key to unlocking this potential, enabling robots to perform complex tasks like delicate assembly, surface finishing, and safe human-robot collaboration. Adding force/torque and collision sensors transforms a robot from a pre-programmed machine into a responsive partner in production.
This guide provides a practical, step-by-step walkthrough for installing and integrating two critical components: a 6-axis force/torque sensor and a collision sensor bumper. We will cover the physical mounting, electrical connections, and initial software configuration, highlighting how quality components are essential for a reliable and robust system.
Prerequisites: Tools and Components
Before beginning the installation, gather all necessary components and tools to ensure a smooth process. A clean, well-lit workspace is crucial for handling sensitive electronics.
Required Components:
- Industrial Robot Arm: The host for your new sensors.
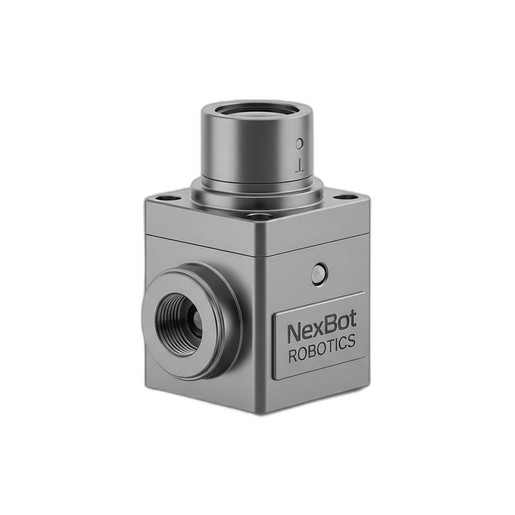
- 6-Axis Force/Torque Sensor: We will reference the NexBot Drives 311-006 (NXB-SNS-311-006), a high-precision sensor ideal for tasks requiring detailed force feedback.
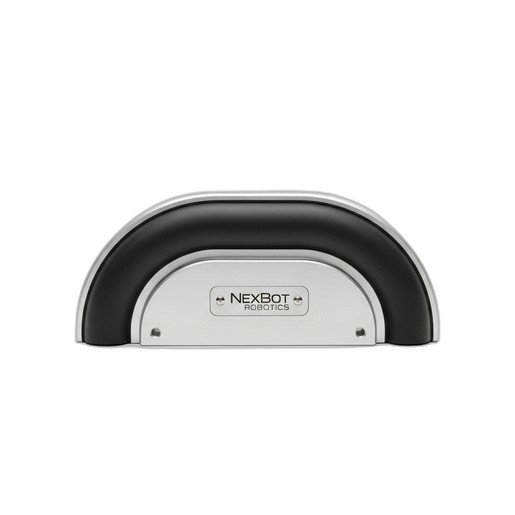
- Collision Sensor Bumper: Our example uses the NexBot Drives 632-006 (NXB-SNS-632-006) for reliable impact detection.
- End-of-Arm Tooling (EOAT): The gripper, welder, or other tool the robot will use.
- Mounting Hardware: Appropriate bolts, adapter plates, and dowel pins as specified by the sensor and robot manufacturers.
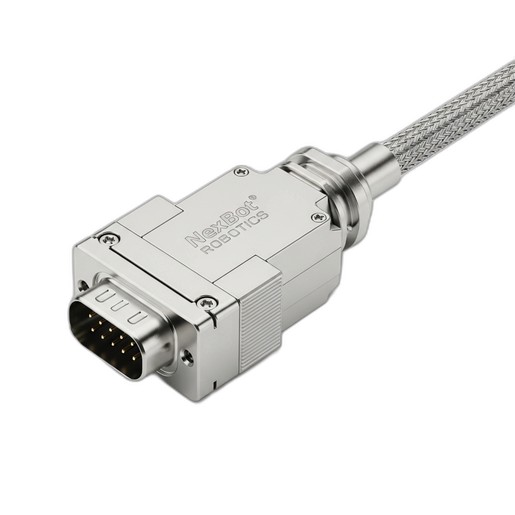
- Cabling and Connectors: High-quality cables and rugged connectors are non-negotiable for industrial environments. The NexBot Robotics 532-005 Rectangular Connector (NXB-CBL-532-005) is an excellent choice, offering a secure, IP67-rated connection.
Required Tools:
- Torque wrench and appropriate sockets
- Hex key set
- Wire strippers and crimpers (if building custom cables)
- Multimeter for continuity checks
- Laptop with robot controller software
- Personal Protective Equipment (PPE)
Step 1: Physical Installation of the Force/Torque Sensor
The 6-axis force/torque sensor measures forces and torques along three axes (Fx, Fy, Fz, Tx, Ty, Tz). It is typically installed between the robot arm's wrist flange and the EOAT.
- Power Down and Secure the Robot: Ensure the robot is powered off and in a safe, stable position. Follow all lockout/tagout procedures.
- Prepare the Mounting Surfaces: Clean the surfaces of the robot wrist flange and the EOAT mounting plate to ensure a flush, secure fit.
- Mount the Sensor: The NXB-SNS-311-006 sensor has mounting patterns on both sides. Align the sensor with the robot flange, using dowel pins for precise positioning if available. Fasten it securely using the correct length and grade of bolts. It is critical to follow the manufacturer's recommended torque specifications to avoid damaging the sensor or creating measurement inaccuracies.
- Attach the EOAT: Mount your end-of-arm tooling to the other side of the force/torque sensor. Again, use the correct hardware and adhere strictly to the specified torque values.
Step 2: Physical Installation of the Collision Sensor Bumper
The collision sensor bumper provides a primary layer of safety, stopping the robot upon physical contact to prevent damage to the robot, tooling, or surrounding equipment.
- Identify Collision Points: Determine the most likely points of unintended contact for your specific application. This could be on the EOAT, the robot's wrist, or other parts of the arm that operate close to fixtures or machinery.
- Mount the Bumper: Secure the NXB-SNS-632-006 bumper to the identified high-risk area. Its design allows for versatile mounting. Ensure it is positioned to be the first point of contact in a potential collision scenario without interfering with the robot's normal range of motion.
Step 3: Ensuring Reliable Electrical Connections
A sensor is only as reliable as its connection. In harsh industrial settings with vibration, dust, and moisture, using robust connectors is essential for maintaining signal integrity and system uptime.
- Route the Sensor Cables: Carefully route the cables from both the force/torque sensor and the collision bumper along the robot arm. Use the robot's existing cable management system to prevent pinching, stretching, or abrasion during movement.
- Terminate the Connections: Connect the sensor cables to the main control cable that runs to the robot controller cabinet. This is where a high-quality connector like the NexBot Robotics 532-005 Rectangular Connector proves its value. Its 32-pin capacity allows you to route signals from multiple devices through a single, secure interface.
- Secure the Connector: The NXB-CBL-532-005 features a rugged housing and an IP67 rating, making it impervious to dust and temporary water immersion. When mating the connector halves, ensure the locking mechanism clicks into place. This provides a vibration-resistant connection, which is critical for components mounted on a moving robot arm.
Step 4: Software Integration and Configuration
With the hardware installed, the next step is to teach the robot controller how to interpret the data from the new sensors.
- Integrate the Force/Torque Sensor (EtherCAT): The NXB-SNS-311-006 uses the EtherCAT protocol, a high-speed industrial Ethernet network.
- Connect the sensor to the controller's EtherCAT network.
- In the robot's engineering software, add the sensor to the network configuration, typically by importing its device description file (ESI file).
- Map the incoming data (Fx, Fy, Fz, Tx, Ty, Tz) to variables within your robot program.
- This real-time data stream is now available for use in advanced programming functions like force-limited assembly, path correction for deburring, or contour tracking.
- Integrate the Collision Sensor (IO-Link): The NXB-SNS-632-006 communicates via IO-Link, a powerful point-to-point communication protocol.
- Connect the bumper to an IO-Link master port on your robot's I/O block.
- Configure the IO-Link master to recognize the sensor.
- The sensor's output is a simple digital signal (collision/no collision) that can be mapped to a robot input.
- Program the robot's safety or motion logic to execute an immediate stop command whenever this input is triggered. IO-Link also provides diagnostic data, which can be monitored to ensure the sensor is healthy.
Step 5: Final Calibration and Testing
The final step is to calibrate and test the system to ensure everything works as intended.
- Calibrate Tool Center Point (TCP) and Payload: The added weight and dimensions of the sensors and EOAT must be configured in the robot controller. Accurately defining the payload and TCP is essential for precise movement and for the force/torque sensor to provide accurate readings.
- Zero the Force/Torque Sensor: With the EOAT mounted, use the sensor's software utility to perform a zero-offset calibration. This ensures that the sensor readings start at zero, accounting for the gravitational force acting on the tool.
- Test the Collision Bumper: At a very low speed (e.g., 10% of max), carefully jog the robot so the bumper makes light contact with a soft, stationary object. Verify that the robot's motion halts immediately as programmed. Perform this test from several different angles.
Conclusion: A More Intelligent and Safer System
By following these steps, you have successfully upgraded your industrial robot with advanced sensing capabilities. The force/torque sensor unlocks a new level of precision for complex, contact-based tasks, while the collision sensor provides a vital layer of protection for your valuable automation assets. Using high-quality, reliable components like the NexBot Drives sensors and NexBot Robotics connectors ensures that your system will perform consistently and safely in demanding industrial environments, maximizing both productivity and operational longevity.