Introduction: The Senses of Automation
In modern industrial robotics, a robot arm's ability to perceive its environment is just as crucial as its strength and speed. Sensors provide the critical data needed for robots to perform tasks with precision, safety, and adaptability. Among the most common and reliable sensors used in automation are inductive proximity sensors, which excel at detecting the presence of metallic objects without physical contact.
This guide will walk you through the complete process of installing, wiring, and integrating an inductive proximity sensor onto a heavy-duty industrial robot. We will be using three core components from the NexBot Robotics ecosystem:
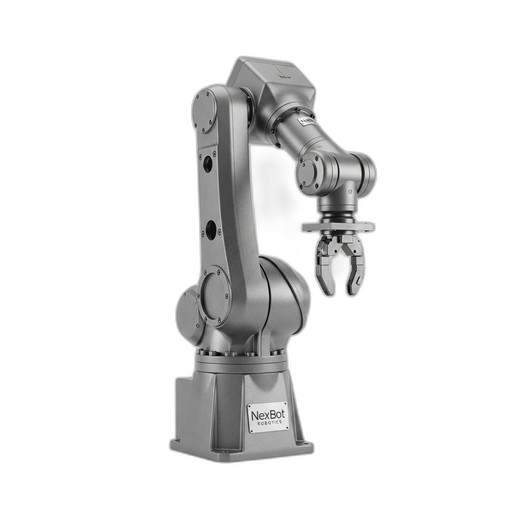
- The Robot: The NexBot Robotics HA014-004 6-Axis Robot Arm, a powerful solution with a 250 kg payload capacity, perfect for demanding material handling tasks.
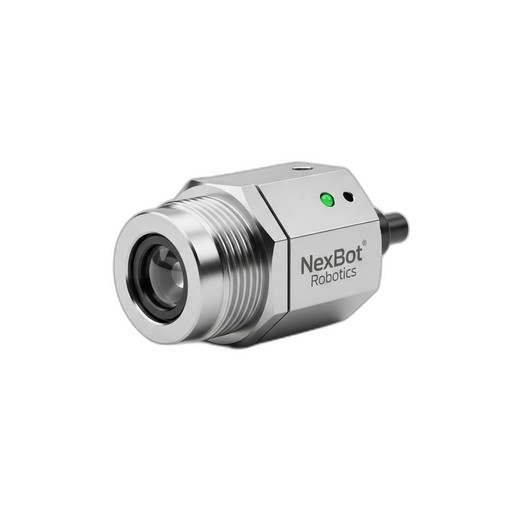
- The Sensor: The NexBot Vision 331-003 Inductive Proximity Sensor, a robust M12 sensor with a 4mm sensing range and an IP67 rating, designed for industrial environments.
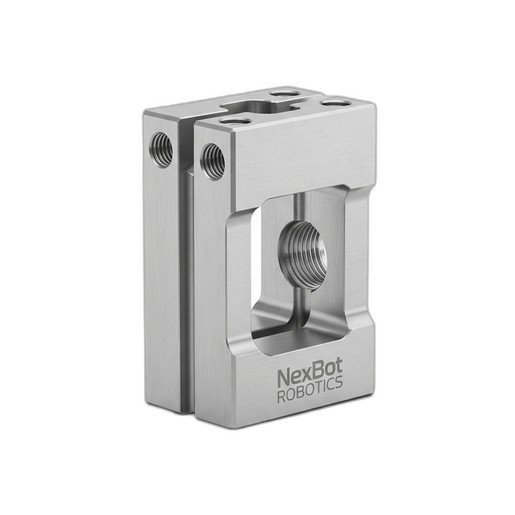
- The Mount: The NexBot Vision 812-003 Sensor Mounting Bracket, an essential component for securely and accurately positioning the sensor on the robot's end-of-arm tooling (EOAT).
By following these steps, you can equip your robotic systems with reliable object detection, enabling more sophisticated and efficient automated processes.
Prerequisites and Safety First
Before beginning any installation, ensure you have the necessary tools and have reviewed all safety protocols. Safety is paramount when working with powerful machinery like the HA014-004.
Required Tools:
- Appropriate wrench set for M12 nuts and mounting bracket bolts
- Screwdriver set
- Wire strippers and crimpers (if applicable)
- Digital multimeter for continuity and voltage checks
- Laptop with robot controller software
Safety Precautions:
- Power Down: Completely power down the robot arm and its controller. Follow your facility's lockout/tagout (LOTO) procedures to prevent accidental startup.
- Discharge Energy: Ensure all stored electrical and pneumatic energy is safely discharged.
- Consult Manuals: Always refer to the official user manuals for the robot arm, sensor, and controller for specific safety warnings and technical specifications.
- Personal Protective Equipment (PPE): Wear appropriate PPE, including safety glasses and gloves.
Step 1: Mechanical Installation and Mounting
The first step is to physically attach the sensor to the robot arm. Proper placement is key to reliable sensing.
- Attach Sensor to Bracket: Take the NexBot Vision 331-003 sensor and thread its two M12 nuts. Insert the threaded body of the sensor through the designated hole on the NexBot Vision 812-003 mounting bracket. Adjust the sensor's position so that its sensing face protrudes to the desired depth, then tighten the nuts to secure it in place. Do not overtighten, as this can damage the sensor housing.
- Mount Bracket to Robot: Identify the mounting points on your robot's end-effector or EOAT flange. The HA014-004 features a standardized flange for this purpose. Align the NexBot Vision 812-003 bracket with the mounting holes. Use the appropriate bolts and washers to securely fasten the bracket to the robot. Ensure the bracket is rigid and does not vibrate during robot motion.
- Positioning and Orientation: Position the sensor so it will accurately detect the target object during the operational cycle. Consider the robot's path and the object's presentation. The 4mm sensing distance of the NXB-SNS-331-003 requires precise placement to ensure consistent detection without risking collision.
Step 2: Electrical Wiring and Connection
With the sensor mechanically installed, the next step is to connect it electrically to the robot's control system.
- Cable Routing: Route the sensor's M12 cable along the robot arm, following the existing cable management channels. Use cable ties to secure it, leaving enough slack at the joints to allow for the robot's full range of motion without straining the cable.
- Connecting to I/O: Connect the sensor's M12 connector to a corresponding digital input port on the robot's I/O module, which is often located near the base or on the arm itself. The NXB-SNS-331-003 operates on a standard 10-30VDC supply, which is typical for industrial I/O systems.
- Leveraging IO-Link: Both the NexBot Vision 331-003 sensor and modern robot controllers like those used with the HA014-004 support IO-Link. This powerful protocol runs over the standard sensor cable and provides significant advantages over simple digital I/O. With IO-Link, you can access advanced diagnostics (e.g., signal quality, operating hours), perform remote parameterization, and receive more detailed status information, greatly simplifying setup and troubleshooting.
Step 3: Configuring the Sensor in the Robot Controller
Once wired, you must configure the robot's software to recognize and use the sensor's signal.
- I/O Mapping: Access the robot controller's I/O configuration settings. Map the physical input terminal where you connected the sensor to a logical digital input (e.g.,
DI-01). Give it a descriptive name, such asPartPresenceSensor.
- IO-Link Configuration: If using IO-Link, you will need to configure the port on your IO-Link master module. This usually involves uploading the sensor's IODD (IO Device Description) file to the controller. This file tells the system everything it needs to know about the sensor's capabilities and data structure.
- Signal Logic: Define the signal logic. Inductive sensors are typically 'Normally Open' (NO) or 'Normally Closed' (NC). Configure the input in the software to correctly interpret the signal state (e.g., a 'high' or 'true' signal means a part is detected).
Step 4: Testing and Calibration
Thorough testing is essential to confirm the installation is working correctly before putting the robot into production.
- Manual Mode Test: Power on the robot system. In a manual or teach mode, check the I/O status screen on the teach pendant or control software. The status of
PartPresenceSensorshould be displayed.
- Trigger the Sensor: Carefully bring a metallic object (the same material as your target workpiece) within the 4mm sensing range of the NXB-SNS-331-003. You should see the sensor's LED indicator light up, and the corresponding digital input in the controller software should change state (e.g., from
FALSEtoTRUE).
- Verify Repeatability: Move the object in and out of the sensing range several times to ensure the signal is stable and repeatable. Adjust the physical position of the sensor bracket if necessary to optimize the detection point.
Step 5: Integrating Sensor Data into a Robot Program
The final step is to use the sensor's data to make your robot program more intelligent.
A common use case is to verify that a part is in place before the robot attempts to pick it up. In the robot's programming language, this logic might look something like this:
- Move to Approach Position: The robot moves to a position just above the expected part location.
- Wait for Signal: The program executes a
WAITinstruction, pausing until thePartPresenceSensorinput becomesTRUE. You can add a timeout to this wait instruction to handle error conditions where a part is not present. - Execute Pick: Once the signal is
TRUE, confirming the part is present and correctly positioned, the robot proceeds with the pick motion. - Handle Exceptions: If the timeout expires, the program can branch to an error-handling routine, such as alerting an operator or moving to a safe position.
This simple logic prevents the robot from attempting to pick a non-existent part, avoiding cycle interruptions and potential damage to the gripper or workstation.
Conclusion
By successfully installing and integrating the NexBot Vision 331-003 proximity sensor using the NXB-SNS-812-003 bracket on the HA014-004 robot arm, you have significantly enhanced your automation system's capabilities. This addition enables the robot to confirm the presence of workpieces, leading to more robust, reliable, and efficient operations. Following a structured approach from mechanical mounting to software integration ensures a successful and durable solution for any industrial application.