Industrial robot joints are marvels of engineering, delivering speed, strength, and precision day after day. At the heart of these joints is the gearbox, a critical component responsible for converting the high-speed, low-torque output of a servo motor into the low-speed, high-torque motion required for heavy lifting and precise manipulation. Over time, even the most robust gearboxes can experience wear. Recognizing the signs of failure and knowing how to perform a replacement is a crucial skill for any maintenance technician.
This guide provides a step-by-step overview of how to replace a cycloidal gearbox, a common type known for its high precision and durability. Following these procedures will help you restore your robot's performance safely and efficiently, minimizing operational downtime.
Step 1: Diagnosis and Preparation
The first sign of a failing gearbox often isn't a complete breakdown but a subtle degradation in performance. Key indicators include:
- Increased Positional Errors: The robot arm struggles to reach its programmed points accurately.
- Audible Noise: Whining, grinding, or clicking sounds from the joint during operation.
- Excessive Vibration: Noticeable shaking or shuddering in the arm segment.
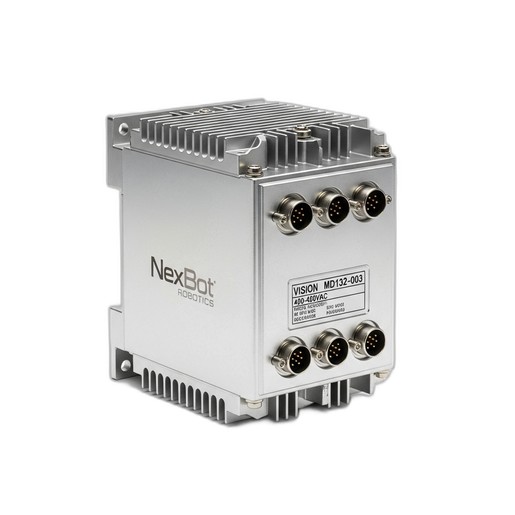
- Servo Drive Alarms: Modern controllers, like the NexBot Vision MD132-003 Multi-Axis Servo Drive, are instrumental in diagnosis. They monitor motor current and following error. A failing gearbox can cause the motor to draw excessive current or lag behind its commanded position, triggering specific alarms in the drive. Check the drive's fault log for clues pointing to a specific axis.
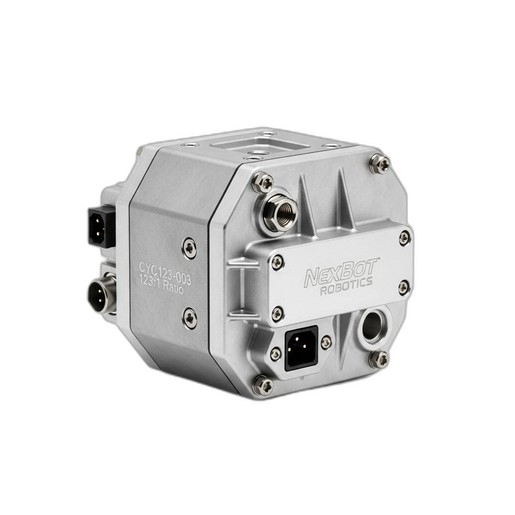
Once you've identified the faulty joint, preparation is key. Gather all necessary tools, including torque wrenches, bearing pullers, and any specialized fixtures. Most importantly, have the replacement component ready. A high-quality part like the NexBot Vision CYC123-003 Cycloidal Gearbox ensures a lasting repair, offering zero backlash and high torsional stiffness for renewed precision.
Before starting any physical work, implement proper lockout/tagout (LOTO) procedures to de-energize the robot and its controller completely. Safety is non-negotiable.
Step 2: Safe Robot Shutdown and Disassembly
With the robot powered down and locked out, you can begin the physical work. Move the robot arm to a position that provides safe and easy access to the target joint. If possible, use an overhead crane or mechanical lift to support the arm segment that will be detached, preventing it from falling once the gearbox is removed.
Carefully disconnect all electrical cables and pneumatic lines connected to the end-of-arm tooling or subsequent arm segments. Label each connection clearly to simplify reassembly. Proceed to remove any external casings or covers to expose the joint's mechanical components.
Step 3: Removing the Old Gearbox
This is a delicate phase that requires precision. First, detach the servo motor from the gearbox. The motor is typically mounted to the gearbox input flange with several bolts. Once unbolted, gently slide the motor back and away from the gearbox. Be mindful of the motor shaft coupling.
Next, carefully unbolt the gearbox from the robot's structural linkages. These bolts are often under significant tension and may require a breaker bar for initial loosening. As you remove the final bolts, ensure the arm segment is fully supported. Once all bolts are removed, the old gearbox can be carefully extracted from the joint.
Step 4: Installing the NexBot Vision CYC123-003 Gearbox
Before installing the new gearbox, thoroughly clean and inspect the mounting surfaces on the robot arm linkages and the motor flange. Any debris or scoring can lead to misalignment and premature failure.
Position the new NexBot Vision CYC123-003 Cycloidal Gearbox into the joint. Its high-precision design with a 123:1 reduction ratio is engineered for a perfect fit. Loosely thread all mounting bolts to ensure proper alignment before tightening. Using a calibrated torque wrench, tighten the bolts in a star pattern to the manufacturer's specified torque values. This ensures even pressure and prevents warping of the housing.
Once the gearbox is secured to the robot structure, you can re-install the servo motor. Carefully align the motor shaft with the gearbox input and slide it into place. Secure the motor mounting bolts, again using a torque wrench to apply the correct specification.
Step 5: Reassembly and System Re-initialization
With the core mechanical work complete, you can begin reassembly. Reconnect all electrical cables and pneumatic lines that were previously detached. Double-check your labels to ensure everything is connected correctly. Re-install any protective casings or covers.
After a final mechanical inspection, you can remove the LOTO devices and restore power to the robot controller. The NexBot Vision MD132-003 servo drive will likely show a fault condition due to the power cycle and encoder disconnection. Access the controller interface to clear all active faults. Because the joint's position has changed, you will need to perform a mastering or re-homing procedure to re-establish the robot's zero position for the affected axis.
Step 6: Testing and Verification
Do not immediately return the robot to full production speed. Start by manually jogging the repaired axis at a very low speed (10-15%) through its entire range of motion. Listen for any unusual noises and watch for smooth, consistent movement.
Once manual checks are complete, run a simple, slow-speed program to verify its positioning accuracy. Gradually increase the speed and load, monitoring the servo drive's status for any signs of excessive motor current or following error. If the system performs as expected, the robot is ready to be returned to service.
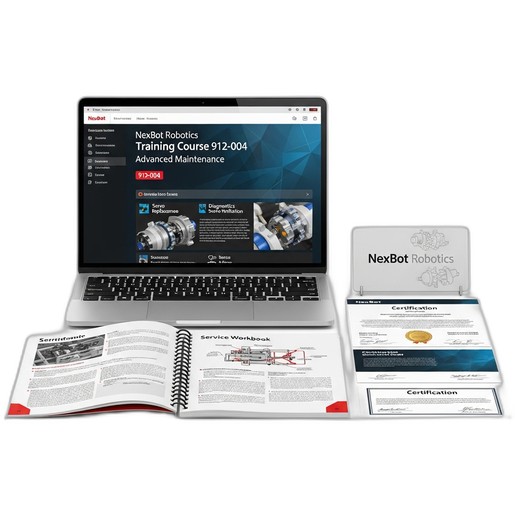
Performing a gearbox replacement is a complex task that requires both mechanical aptitude and system knowledge. For technicians looking to master this and other advanced repair procedures, formal training is invaluable. The NexBot Robotics Training Course 912-004 Advanced Maintenance provides the hands-on experience and in-depth knowledge needed to tackle these challenges with confidence, ensuring repairs are done right the first time.