Introduction: The Heart of Robotic Precision
At the core of every high-performance industrial robot lies a system of incredibly precise components working in perfect harmony. Among the most critical is the cycloidal gearbox, the unsung hero responsible for translating motor power into smooth, accurate, and powerful arm movements. Its zero-backlash design and high torsional stiffness are what allow your NexBot robot to perform tasks with sub-millimeter repeatability.
However, like any high-wear mechanical component, a gearbox can eventually reach the end of its service life. Performing a replacement correctly is crucial to restoring your robot's original performance and preventing costly unplanned downtime. This guide provides a general overview of the replacement process. For hands-on, expert-level instruction, we always recommend professional training.
When to Consider a Gearbox Replacement
A failing gearbox doesn't usually happen overnight. It provides warning signs that a skilled technician can identify. Proactively addressing these symptoms can prevent a catastrophic failure during a critical production run. Key indicators include:
- Increased Audible Noise: A grinding, whining, or clicking sound from a specific axis that intensifies under load.
- Excessive Vibration: Noticeable shuddering or vibration in the robot arm, especially during acceleration or deceleration.
- Positional Inaccuracy: The robot arm fails to reach its programmed points consistently, leading to quality control issues. This is often caused by internal wear creating backlash (play) in the gearbox.
- Motor Over-Current Alarms: A worn or binding gearbox forces the axis motor to work harder, which can trigger protective fault codes in the controller.
Safety First: Pre-Replacement Checklist
Before you even pick up a wrench, safety is paramount. A multi-axis industrial robot is a powerful piece of equipment that must be respected.
- Read the Manual: Always consult the official NexBot maintenance manual for your specific robot model. It contains detailed diagrams, torque specifications, and safety warnings.
- Power Down and LOTO: Execute a full Lock-Out/Tag-Out (LOTO) procedure to ensure no electrical, pneumatic, or hydraulic energy can be accidentally supplied to the robot.
- Secure the Arm: Mechanically brace or support the robot arm to prevent it from falling or moving unexpectedly once the gearbox is disengaged.
- Use Proper PPE: Wear safety glasses, gloves, and steel-toed boots as a minimum requirement.
- Prepare the Workspace: Ensure you have a clean, well-lit area with all necessary tools, parts, and lifting equipment readily available.
Step 1: Preparation and Disassembly
With the robot safely secured and powered down, you can begin the disassembly. Using your robot's technical manual as a guide, carefully remove any external cowlings or covers to access the target gearbox and motor assembly.
Label all electrical and encoder cable connections before disconnecting them from the axis motor. This simple step prevents confusion during reassembly. Once the motor is disconnected, carefully unbolt it from the gearbox housing and set it aside. Next, proceed to unbolt the old gearbox from the robot's structural frame. Be prepared for its weight and have a plan for lowering it safely.
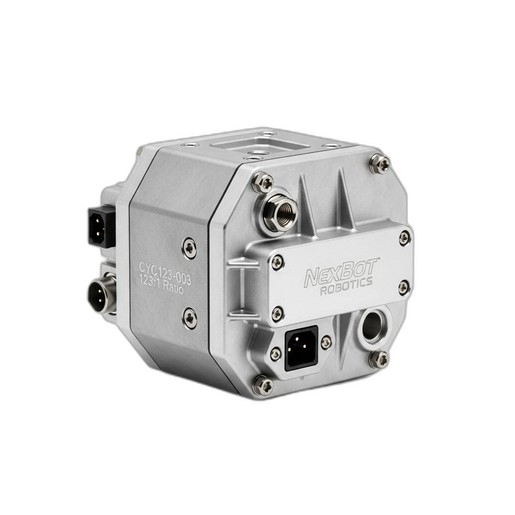
Step 2: Installing the New NexBot Vision CYC123-003 Gearbox
With the old unit removed, you can prepare for the installation of the new component. A genuine replacement part like the NexBot Vision CYC123-003 Cycloidal Gearbox ensures a perfect fit and restores the robot's original performance specifications.
First, thoroughly clean the mounting surfaces on both the robot frame and the axis motor. Any debris or old grease can cause misalignment. Carefully lift the new gearbox into position, ensuring any alignment dowels are properly seated. Hand-tighten the mounting bolts to secure it in place before using a calibrated torque wrench to tighten them to the exact specification listed in the manual. This is critical for ensuring the gearbox, rated for a peak torque of 250 Nm, can handle operational stresses without issue. Its 123:1 reduction ratio is key to the robot's strength and precision, and proper installation protects this capability. Finally, reinstall the axis motor, again following all torque specifications.
Step 3: Reassembly and Calibration
Reconnect the motor power and encoder cables, referencing the labels you made during disassembly. Reinstall any protective covers. Once all mechanical and electrical connections are secure, you can remove the LOTO and power on the robot controller.
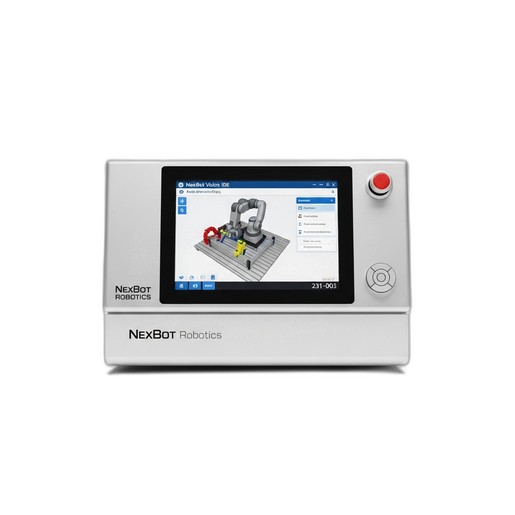
This is where software becomes essential. Using the NexBot Vision 231-003 Programming Software, you will need to perform several critical post-maintenance tasks. The first is to 'master' or 'zero' the axis. Because you have installed a new mechanical component, the robot's previous home position data is no longer valid. The software provides a guided routine to accurately find the new zero position for the axis. Following mastering, run the robot at low speed through its full range of motion to confirm smooth, quiet operation. Then, execute a test program to verify its positional accuracy and repeatability before returning it to production.
Beyond the Guide: Advanced Maintenance Training
This guide covers the fundamental steps of a gearbox replacement, but true expertise comes from professional training and hands-on experience. Procedures like this involve dozens of small but critical details that can impact the safety, performance, and longevity of your equipment.
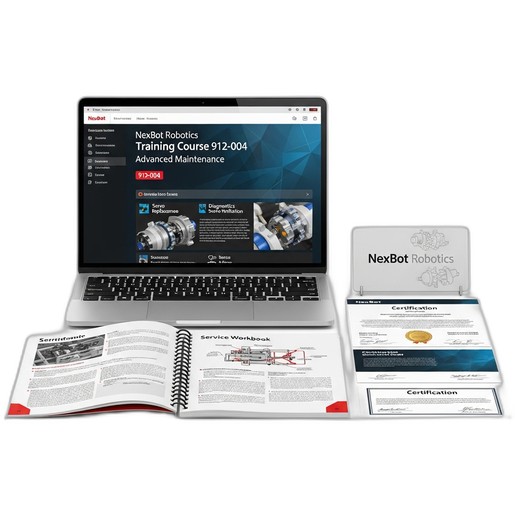
For technicians who need to master these skills, the NexBot Robotics Training Course 912-004 Advanced Maintenance is the definitive resource. This intensive 3-day course moves beyond theory, providing in-depth, practical training on diagnostics, component replacement, system calibration, and advanced troubleshooting for the entire NexBot ecosystem. Investing in your team's skills is the best form of preventive maintenance you can perform.